


We can’t control the weather, but we can prepare for it. No matter where your aerial adventure operation is located, foul weather is a factor that can and will interrupt operations at some point. How well you prepare for the worst will determine how quickly you can recover, and how costly it will be.
There are steps you should take to plan and prepare for when extreme weather hits your operation, for both an existing business as well as one still in the initial planning stages, especially in areas prone to such extremes.
Of course, there are a variety of natural disasters and other events that put your operation at risk. The steps outlined here apply to planning and preparing for just about any of these. But we’re going to focus on weather-related perils here.
The planning process consists of three steps:
1. Identify your risks
2. Develop a plan
3. Take action
Spend deliberate time on each part of this plan. Analyze each risk factor and its possible impact given your property location, landscape, type of trees, terrain, drainage, and elevation. This helps determine which risk factors require your greatest attention.
You will not be able to eliminate all the risk, of course. Your aim is to limit it as much as possible.
STEP 1: IDENTIFY YOUR RISKS
Weather issues come in several forms, with wind, rain, and flooding chief among them. Location largely determines the types of threats you are most likely to face. For example, hurricanes shouldn’t be a risk for operations in Colorado, but wildfires and high winds could be.
Review historical weather extremes for your location. This can include:
• 100-year flooding and storm surge data
• historic high winds
• scope of damage from previous hurricanes and extreme weather events.
Take into consideration the high water marks (so to speak) of all your risk factors. Then increase your estimates for the future, to account for the reality that our weather systems are becoming larger and fiercer. Plan and design with the future in mind.
Consider, for example, the worst-case scenario that North Carolina experienced in 2018 with Hurricane Florence and Hurricane Michael hitting just a month apart. It was a terrible 1-2 punch, with Florence pouring more than three feet of rain on Elizabethton, N.C., in a very short amount of time.
Evaluate your support structures. While poles and towers are meant to be static and can be reinforced for higher wind loads, trees are dynamic. They can be guyed to counteract the forces imposed by zip lines, but it’s not easy to counteract the forces of high winds.
To assess the strengths and limits of your trees, consult with a licensed arborist at least annually. Healthy trees are more likely to survive a severe storm. Consider cabling and bracing multi-stemmed trees, even if they aren’t part of the course. Every tree within striking distance of your course should get the same attention and treatment as those supporting the course.
STEP 2: DEVELOP A PLAN
For existing operations, start by assigning tasks to key employees based on your assessment of risks. Developing the business continuity plan should be a team effort. There should be budgets and due dates assigned for developing the plan.
FEMA has developed a workbook to help with this. (For details and to get a copy, see the bracketed information on the next page.) Per FEMA, your plan should include action items regarding your staff, surroundings, space, systems, structures, and service. Among the considerations: What does it take to secure your property? How will you protect your IT systems? What will it take to reopen the facilities after the weather passes? How will you communicate with guests throughout?

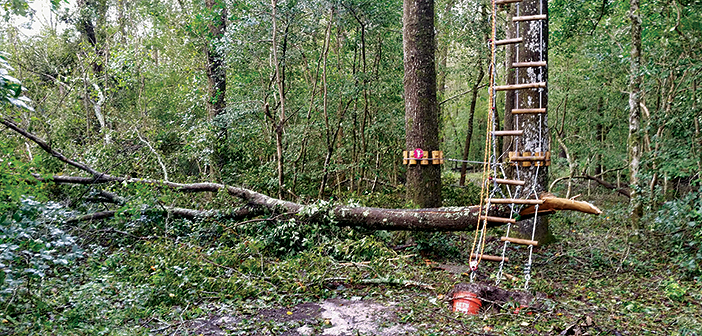
Hurricane Florence toppled this tree-based platform at the Marine Confidence Course at Cherry Creek Marine Corps Air Station in North Carolina. Photo: Challenge Towers.
Complete your plan by identifying all the necessary actions you must take. Print out the plan and put it in some three-ring binders—you don’t want this information stored in a computer when the electricity goes out. Store the binders in an accessible place and make sure all the right people know where to find them.
Your plan will include several sections:
1. Emergency procedures. Your procedures depend on the hazard.
A derecho or a severe thunderstorm might force you to close a full tour or park and perform well-rehearsed course evacuation procedures. If a storm forces course evacuation, Lori Pingle at ZipZone in Columbus, Ohio, suggests having guests enter the office one or two groups at a time to re-book. This prevents everyone from wanting a refund if, for example, one group is only in town for a short visit and won’t be able to reschedule.
Pingle notes that after closing for a storm, a thorough course inspection must be performed before reopening to ensure nothing was damaged.
If a hurricane is coming, you should block new reservations and call anyone who has an existing reservation to offer them a rain check. Add a notice to your website and post information on your social media accounts.
2. Rebuilding. Assess the abilities of your staff when it comes to maintenance projects. To what extent can they help with repairs and rebuilding?
Next, ask your builder:
• How many crew members do you have?
• How available are they at the last minute?
• Do you charge differently depending on the time of year or for emergency work?
• What is your policy on charging for travel expenses?
Pricing repairs or rebuilds can be a moving target, at least until the builder or inspector can assess the situation on-site.
Remember, rebuilding a portion of your course, or replacing a tree with a pole, is considered a major modification under the Association for Challenge Course Technology’s standards. Major modifications require an acceptance inspection and commissioning procedures. Talk to your vendors about scheduling that third-party inspection, and make sure your builder is providing you with all the documents required.
3. Materials. Coordinate with your builder to determine a list of appropriate materials and equipment to keep on-site for future repairs. Wire rope, some rigging hardware, and even utility poles are relatively inexpensive and easy to store. Utility poles can be a key item to have on hand: 45-foot utility poles can be in short supply a week after a major hurricane, when the power companies are trying to replace hundreds of poles.
4. Funding a closure. If a major event forces you to close your park and rebuild, how will you pay for it with no cash coming in? After hurricane Irma came through and damaged TreeHoppers Aerial Adventure Park in Florida in 2017, owner Benjamin Nagengast says the biggest surprise he encountered was the need to keep his staff working, and paid, while the park was closed and being rebuilt. Thankfully, he had a cash reserve that helped cover the cost of payroll and rebuilding. Most of his staff kept busy cleaning up debris and branches and helping the building crew.
5. Communications. After a weather event like a hurricane, keep your followers updated on social media so people know you’re open, or working to get open. And promote your opening aggressively: Nagengast opened half his park at half price, and advertised it well when he did.
STEP 3: TAKE ACTION
1. Once you have your plan organized and agreed upon, make sure everyone knows where to find it.
2. Practice key steps to speed your reaction time and ensure successful completion.
3. Make sure that backup systems, such as gas generators, are maintained and operational.
4. After an extreme event, evaluate your performance and make improvements for the next event. What went right? What didn’t?
Cape Fearless Extreme adventure park in North Carolina suffered extensive tree damage as a result of a severe storm. Photo: Ron England
One final piece of advice: dealing with a disaster will require great fortitude. So, remember that if you lose power, you can fill your washing machine with ice and beer. Yes, it’s one more step, but you’ll thank yourself later.
BUILD FOR THE WORST WEATHER
To some extent, your course design is the first step in preparing for weather extremes. A challenge course or zip tour is typically built to handle the maximum wind loads expected for a particular location.
Design wind speeds, which are used to calculate wind load, vary from up to 110 mph on the West Coast to 170 mph near the Gulf Coast and up to 225 mph in certain places in Colorado and the Midwest. These wind speeds often govern the design of adventure parks and challenge courses, especially if the elements have plenty of surface area to catch wind forces.
Planning Resources
To help you asses your business’s risks and develop a preparedness and mitigation plan, there’s a great checklist and other resources in the Ready Business Hurricane Toolkit on the FEMA website (www.fema.gov)
There are also helpful resources at ready.gov that provide outlines and planning help for extreme events ranging from earthquakes to hurricanes to terrorism.
The surface area of structures and elements can be troublesome—think cargo netting in regions where icing can occur. Climbing walls and enclosed platforms also are prime structures for adding lots of additional wind forces.
The following factors also come into play:
• the height of the structure
• the basic wind speed of the region
• whether the structural members are round or flat
• the local topography (nearby hills or escarpments can increase the wind effect)
As a result of these factors, the cost of building the same course in different parts of the country can vary widely depending on the local conditions. An engineer should review any proposed site and help determine what factors will come into play.
COASTAL CONSIDERATIONS
Coastal locations are prime for building an aerial adventure park, but they are also susceptible to some of the most extreme weather in Mother Nature’s repertoire—destructive hurricanes—
especially along the Gulf of Mexico and Atlantic Ocean. So consider the impacts weather can have on your entire property, not just the installation itself.
Site Selection. When choosing a property to build your coastal aerial adventure course, consider the following:
• course design and style of course
• support system: trees or poles
• elements: removable or permanent
• location—the higher above sea level, the better
• lightning protection
• machine and material access
• emergency access
Poles or Trees? When planning your course or tour anywhere near coastal regions, the simple fact is, poles are more resilient than trees. Pole courses withstand the winds and water better and are easier to repair from storm damage. Trees are wonderful from a design and guest experience perspective, and are often less expensive to build in, but they can be uprooted, break apart, and die.
That said, trees are still a perfectly viable option, and can withstand a remarkable amount of abuse from the elements.
Many trees have withstood the test of time along the coast. In most cases, a tree course is most at risk when a storm is Category 3 or higher, because the winds will create significant movement, causing cables to buckle up and down, and this cycle loading is what can break things.
Understand what insurance coverage you have available, and the limits of that coverage, so repairs can be performed quickly following severe damage, like this at the Marine Confidence Course in North Carolina. Photo: Challenge Towers.
Precautions for trees. Some general considerations for your tree-based site include:
• Have an arborist assess and develop a care plan for your trees.
• Remove all dead limbs and cut out or cut back trees that are too close to your course or zip corridors.
• Remove weak or problematic trees.
• Consider guying trees that might need structural support from the loads created from the course or zip lines.
• Evaluate the soil conditions to ensure the trees are in stable footing.
• Choose species of trees that are better suited for these applications and are hardier in hurricane-prone areas. These include loblolly pine, live oak, and Southern yellow pine. Avoid softer species such as coastal poplar, pine, and sweet gum.
Preparing your pole-based site for extreme weather:
• Make sure your guy lines are snug and slack is removed.
• Make sure ground anchors are secure.
• There should be minimal slack in your cable systems to minimize movement in high winds.
• As an extra precaution, remove large nets and climbing structures, if possible.
• Remove any suspect trees that are close to your course, especially along your zip line corridors.
INSURANCE: THE FINAL LINE OF DEFENSE
Robert Monaghan of Hibbs-Hallmark, a major insurer for the aerial adventure industry, says insurance coverage options can help cover your costs and lost income. He advises owners to insure their property for its full replacement cost. His main message: understand what coverage you have available and the limits of that coverage.
Property policies are typically written to cover real property, such as buildings and business personal property (furniture, equipment, etc.). The policy can be modified to cover other property, such as cables, platforms, and anchors, for example. However, the trees that the cables attach to are generally not covered, because it’s difficult to apply a monetary value to a tree. Perhaps it’s the cost of replacing it with a pole, or the cost to “re-route” the zip line? Discuss these things with your insurance agent.
Insurance policies specifically define perils that are or are not covered, such as flood, fire, theft, etc. The exclusions may vary depending on your location. For example: according to Monaghan, if you live near the coast, wind and hail are often excluded perils under your standard property policy. Some insurance companies will offer coverage for wind and hail, but with a higher deductible. It’s possible that your only option is to purchase coverage through your state’s wind pool.
Business interruption insurance can be valuable. This covers income lost during the period of restoration, and can also include coverage for extra expenses incurred related to continuing your operations to minimize business income loss during the period of restoration.
Property insurance only covers property owned by the named insured—not rented or leased equipment. Inform your insurer if you have property of others in your care, custody, and control.
An “inland marine” policy, also known as contractor’s equipment or miscellaneous equipment floaters, can cover equipment that tends to be used all over the property or off premises, such as ATVs, radios, computers, lawn equipment, etc.
Monaghan recommends fully documenting everything you own and insure, no matter what policy it’s covered under. At the time of a loss, you need to prove your claim by providing documentation for the items you have lost.
Take a video of the entire course or structure, all your equipment, the computers, and office space. Do this regularly, and keep your records off site, so they are not lost in a disaster along with other park assets.