


While we’ve been able to shift back to in-person training after the pandemic forced us to go virtual for a time, the experience has provided a valuable takeaway: that hybrid training—training that has both in-person and virtual components—can work, despite prior skepticism.
Hybrid training programs can offer myriad benefits: efficiency, affordability, consistency, and convenience, to name a few. A hybrid model can save you and your staff time, by arming them with valuable background knowledge before they arrive on site. Such a model can also reach a larger audience, because the virtual learning component of the training can be done anytime, anywhere.
DESIGNING A HYBRID PROGRAM
It does take some work up front to realize these benefits, but many feel it’s worth the investment. To design a hybrid training program and help ensure the quality of that training, it’s important to first follow some key steps:
- Select a topic.
- Outline the content.
- Find or create the content (i.e., make a video, find photos, create a flip chart).
- Build the modules.
- Deliver the training.
- Evaluate the training (both from a participant standpoint and the effectiveness of the training).
- Keep in mind, these steps encompass both virtual and in-person modules.
STEP 1: SELECT A TOPIC
First, select a topic. It could be derived from a needs assessment conducted with staff, the need to meet published ACCT or PRCA standards, or the need to address a new protocol or environment, such as Covid-19 safety practices at the height of the pandemic. There are several topics traditionally covered in-person that can easily be switched to a virtual environment. Among them: explaining the employee dress code, shift expectations, and timesheet entry.
After selecting the topic, the training should be classified in one of three categories: basic training, intermediate training, or advanced training. In addition, prerequisites for it, if any, should be established during this first step.
STEP 2: CREATE AN OUTLINE
Now it’s time to create an outline of the content. The content, of course, is what staff members must learn and become proficient in for the selected topic. Once the outline is complete, determine which components can (and should) be delivered in-person, and which can be delivered virtually. Some components will likely fall into both categories, so in determining which should be offered in-person vs. virtually, consider:
- What gear or equipment is needed? Can participants access similar equipment from home?
- Is the course element (i.e., cables, platform) essential for this training component?
- Would a virtual presentation for this component be effective vs. having participants be on site?
STEP 3: FIND OR CREATE THE CONTENT
Next, it’s time to find existing content, or create the content needed for both the in-person and virtual aspects of the hybrid training. The trainers will need to identify how the two can segue and complement one another. For example, the content in your aerial adventure operation manual can be used in the virtual module as well as in the face-to-face module; you will need to identify how.
Gathering the content as an initial step is important so that later, when creating both the in-person and virtual modules, all the preparation has been done. This will make it easier down the road.
Existing content can come from a variety of sources, such as the operation manual, employee handbook, manufacturer documentation or handbook, industry textbooks, or the curriculum from a certification program. Incident trend reports can also inform the content. Additional material for the training topic can be found in trade magazines like Adventure Park Insider, in TED Talks, through professional online groups, Google Scholar, industry websites, and podcasts. If necessary, cite the source or ask for the author’s permission to use existing material.
Video production. Another option is to create original content for your training. Videos may be the optimal choice for creating new content, as this method allows the trainee to see, hear, and potentially practice at their own pace.
Utilizing a screen-capture tool (aka a screen recorder)—which records the computer screen as the user navigates a document, intranet website, or other software that will be used by staff—is a good way for the trainer to show new staff how to use systems and where to find your protocols and policies. With a screen-capture video, the trainer could, for example, show employees how to complete and file an incident report, how to process a credit card transaction, or a number of other simple actions.
First-person point-of-view videos are useful, too. For example, the trainer could record while walking through the helmet zone of the aerial challenge course, pointing out the boundaries of the helmet zone and bringing to life a policy in the employee handbook or ops manual. Video can also be used to demonstrate guest orientation and/or gear up, show how your belay system works, or highlight other visually explanatory content.
Some tips for creating effective videos:
- Write a storyboard. This is a visual representation of the narrative of the video. A quick internet search will bring up instructions on how to write a storyboard and even provide some templates.
- Write a script, use a teleprompter. There are many effective—and free—teleprompter smartphone apps.
- Practice, practice, practice. Being in front of a camera is like any other skill, the more you practice, the better you get.
- Use a green screen—a solid background that allows for digital effects to be added later. A fabric store will have affordable options.
- Be energetic.
- Keep it short (under six minutes).

Use a green screen (left) when filming your video so you can add text and effects to the background afterwards (right).
Besides video, you can create your mix of digital and in-person hybrid training content using text, slideshows, cheat sheets, worksheets, handouts, photos/images/illustrations, infographics, and/or diagrams.
Leverage technology. There are several technology tools available that you can use to create such content, including:
- Google Drive: cloud-based information storage with sharing capabilities. Applications such as Google Forms and Google Sheets are also very useful in hybrid training.
- Camtasia: a software that allows the creation and recording of videos using screencast (a video recording of a computer screen, often containing audio narration).
- Poll Everywhere: an online tool that allows the audience to respond to questions and interact with the trainer.
- Padlet: a cloud-based software that allows collaboration among users using virtual bulletin boards.
- Canva: a cloud-based graphic design tool.
Synchronous or asynchronous. It is important to differentiate whether the content you’re creating is going to be used in a synchronous or asynchronous format.
Synchronous format means that the trainer and trainees interact with each other in real time. For remote synchronous training, everyone is meeting at the same time from different locations using tools like Zoom, Microsoft Teams, Google Meet, or YouTube Live. cont. >>
On the flip side, asynchronous format is when the trainees interact with the virtual training materials at different times. This means that everybody is working at their own pace, on their own schedule.
Asynchronous format is an example of a time-saving benefit of hybrid training, since the operator can have staff watch pre-recorded videos prior to arriving to the site for the in-person training component. A downside could be ensuring that staff complete the virtual component prior to the in-person training.
For asynchronous learning, consider using a learning management system (LMS) like Moodle, Canvas, or Teachable. Some of these are free for educators, and others are free but the organization needs to host the content. More robust LMS options are subscription-based, but are plug-and-play and start at around $50/month (Teachable).As discussed, the digital modules of your hybrid training may rely mostly on videos, which are useful because they deliver information consistently time after time.
STEP 4: CREATE THE MODULES
The content you’ve created will need to be organized into learning modules. Be it in-person or virtual, a learning module should be focused around a specfic topic and include learning objectives, learning materials, and learning activities. For example, a module on personal protective equipment might have the following components:
- An introduction to personal protective equipment. (Topic)
- A description of the skills or concepts this specific lesson is going to target. (Learning objective)
- A written description of PPE. (Learning materials)
- A video describing the PPE for adventure guides: helmet, harness, gloves, etc. (Learning materials)
- A short, three-question multiple-choice quiz. (Learning activity)
Assessment. It is important in any learning module to offer participants the opportunity to practice, apply, analyze, and synthetize new information through learning activities, such as tasks, quizzes, video analysis, etc. You must also assess if the participants have achieved the learning objectives and provide feedback to participants.
When a training is in-person, a trainer typically provides feedback in real time. In virtual, asynchronous training, you need to define when the participant can expect feedback (that’s not automated) on learning activities. For example, “After completing this quiz, the trainer will provide feedback within 48 hours.” Or, “The trainer will review answers every Friday during the regularly scheduled virtual meeting.”
To develop a proper assessment, create criteria to be measured that aligns with the learning objectives, then develop an instrument to measure performance, such as a rubric. A checklist for observable behavior is another instrument used to assess skills.
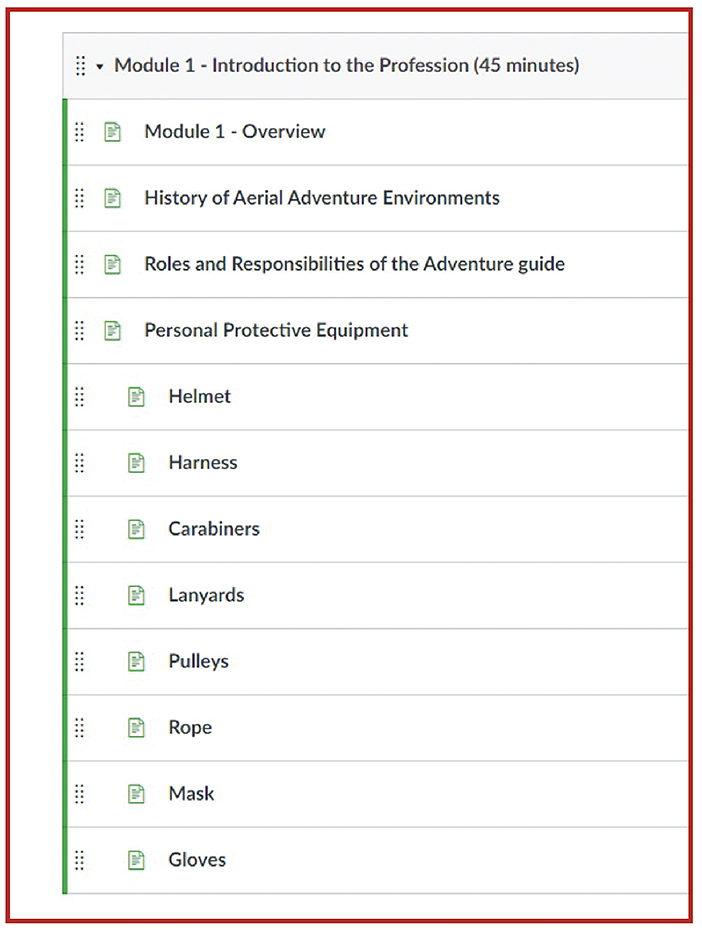
An example of a training module.
STEP 5: DELIVER THE TRAINING
Once you’ve built your modules, it’s time to deliver the hybrid training. Before doing so, ask yourself these questions:
- What virtual components are going to be synchronous versus asynchronous?
- How long will participants have to complete the virtual training?
- Who is going to teach the in-person and/or synchronous components of the training?
- Who’s going to monitor the asynchronous online or virtual components of the training?
- If feedback for the virtual components is not automated, who will provide it?
Once these have been answered, notify participants of the dates for the in-person component and the timeframe for completing the virtual component.
STEP 6: EVALUATE THE TRAINING
Finally, it’s time to assess/evaluate your training. Consider performing two types of assessment: one about the participants’ learning (i.e., did they gain the knowledge, skills, and/or attitudes expected in the training?); the other evaluating the training overall for participants’ satisfaction, job readiness, and the mechanics of the training.
To evaluate participants’ learning during the in-person component, use written exams, scenarios and/or simulations, and/or practical assessments. For the virtual component, written exams, virtual observations (i.e., trainees demonstrate a skill via Zoom), and participant-submitted video demonstrating skills are all ways to assess knowledge.
In terms of evaluating the overall training, a final survey to measure satisfaction and readiness for the job is an optimal method of assessment.
TIME-CONSUMING, BUT WORTHWHILE
Developing hybrid training takes time—an estimated 100 hours of preparation and creation for each hour of hybrid training. However, that initial time investment will ultimately pay off in year-after-year savings of time and money.
In developing your hybrid training, ask yourself: What is the low-hanging fruit? Consider outsourcing parts of the virtual component of the training to somebody else. Get the right tools for the job. Finally, use the steps described in this article to create your next hybrid training.


