Trees are alive and dynamic—which means they are constantly changing under the pressures of growth, weather, the local ecology, and the physical loading you apply as course operators and users. Daily observations are essential to managing day-to-day tree problems and determining when to call in a certified arborist for help.
Here, we share some best practices for your in-house tree assessments.
In-House Assessment
Who? Choose staff members that are frequently on the course and have good observational skills, and get them trained in how to conduct tree assessments. Have the same staff members regularly conduct the assessments because they’ll develop historical knowledge to more easily spot changes in your course trees.
What? Have your staff look for immediate issues, like broken branches over course elements, signs of tree responses to hardware, such as a partially enveloped attachment bolt, and indicators of longer-term issues, such as canopy decline or potential stem decays. (See Data Collection, below, for more details.)

Top to bottom: A broken branch hanging by a small piece of tissue, like this one, should be managed to prevent it from falling onto course elements below; an example of yellowing or chlorotic foliage found to be caused in this case by tree stress resulting from soil that had been heavily disturbed and compacted; when trees envelop hardware, like this bolt, it is time to adjust the attachment or replace it.
Work with your arborist to develop an assessment protocol, identify existing tree conditions that should be monitored, and put together a data sheet where staff can record their observations. Your tree management protocols should be in line with local state and municipal requirements around inspection, permitting, and standards compliance, as well as ASTM and ANSI standards.
When? In-house assessments should be incorporated into your existing course inspection schedule. A level 1 walk-by assessment of the course trees should happen daily. A level 2 basic assessment—a closer visual inspection of the trees—can be done on a weekly or bi-weekly basis.
How? A daily level 1 assessment is a quick scan of the trees and can take place predominantly from course height. Staff should walk through the course, recording immediate and obvious issues like broken branches or cracked trunks. To get a full picture of your course trees:
Step 1: Stand on a platform and scan the trunk of the attached tree up and down all the way to the base and on all sides.
Step 2: Look up at the canopy on all sides.
Step 3: Look at the trees to which the previous and next platforms are attached to get a perspective of those course trees from further back.
Step 4: Repeat steps 1-3 on each platform.
Step 5: Scan the trees surrounding the course elements and lines.
To conduct periodic level 2 basic assessments, walk 360 degrees around the base of each course tree. Scan the tree starting at the soil level, moving up the trunk and into the canopy. Repeat this scan from course level. This assessment is more detailed; use binoculars to get a good look at the canopy and take photos so you have a record of tree condition. Photos are useful for comparing forest and tree condition over time—especially if the images are taken from the same location and in a similar light.
Data Collection
Data from tree assessments can be recorded in many ways. A paper form with a checklist and notes may be sufficient, or assessments can be recorded digitally so they are easier to share. There are several different digital tools you can use, from basic spreadsheet software to a form in an online survey program or a customized app.
Your medium should be consistent with what you use to monitor other parts of your course and should provide your staff with a quick checklist to ensure they make all necessary observations.
What to look for. Look for conditions that could immediately impact your course lines and elements or the paths below. These include broken branches, trunk cracks, or trees that have developed leans. These types of issues need to be dealt with before customers use the course.

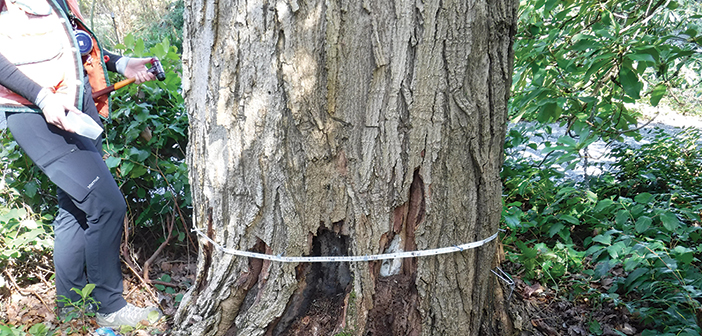
Top to bottom: A tree with a vertical trunk crack and an uncorrected lean poses a risk to a course; that tree—its stump seen here—was removed, and an extensive column of decay was found along with evidence that the crack had crossed the remaining sound wood into the hollow; cracks in the soil, like this one, can indicate movement or shifting of the root plate.
Observe how the trees are responding to their attachments. Look at tree attachment bolts, cables, and any other hardware on the tree. If the tree is starting to envelop and grow around the hardware, this indicates that you need to adjust the attachment or start thinking about replacing it. Fully enveloped parts are not only hidden and unable to be inspected, but also create major structural weakness in a tree that can make the tree more prone to failure.
Watch for new and changing conditions in the forest, such as changes in canopy color, off-season leaf drop, or dieback. As you look around, note whether the changes you observe are on multiple trees or just one.
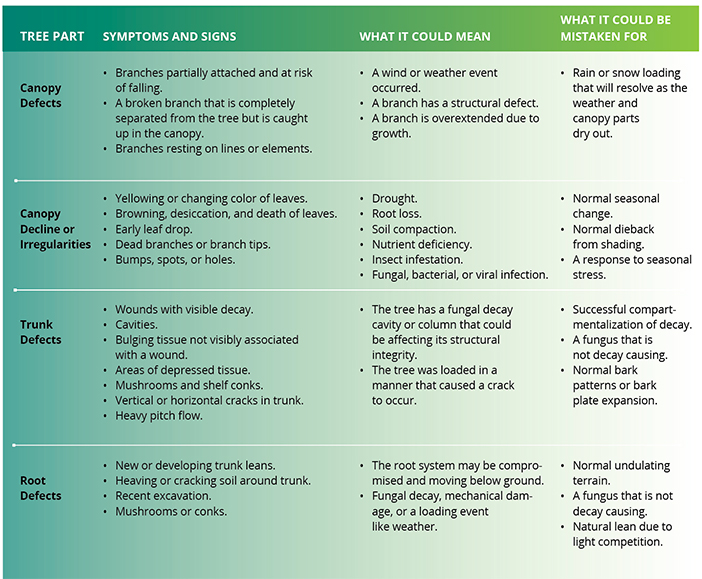
Look for symptoms and signs that may be an indicator of a more systemic tree health or structural problem. Describe where you are seeing the symptom or sign on the tree—is it isolated to the top of the canopy, only on one branch, or all over? These observations give your arborist clues for diagnosing any problems later.
The chart below has some examples of common issues and how to identify them.
What to Do with Your Observations
An arborist who knows your course, the species of trees, baseline conditions of your course, and the kinds of tree health issues present in your area can help you design an effective decision-making protocol to inform what actions you should take based on the observations you make.
This decision-making protocol should provide guidance on what kinds of issues may be an indicator of elevated risk and thus require professional help. In general, structural issues in trees, especially those that develop quickly, present a higher and more immediate risk than tree health issues. However, some symptoms of stress can be an indication of a structural or systemic issue that is not visible from the outside of the tree.
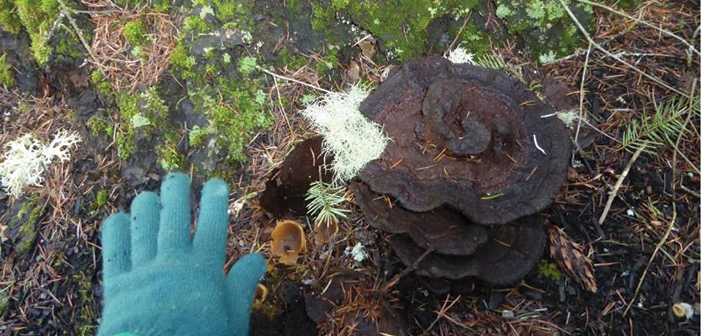
Fungal fruiting bodies at the base of a tree, like this decay-causing one called Dyer’s polypore (Phaeolus schweinitzii), can indicate a root defect.
Here are a few example observations and decision-making protocols:
Broken branch on a line or dangling over course element.
> Close access to element.
>> Remove branch.
>>> Reopen access to element.
Yellowing foliage in the middle of summer.
> Keep course open.
>> Check if irrigation systems are working properly.
>>> Consider if any recent changes occurred that could affect the health of the trees, like drought or soil disturbances.
>>>> Monitor the canopy condition over the next few weeks to a month.
>>>>> Call an arborist for an evaluation if the condition persists.
Leaning course tree with heaving soil at the base.
> Close course.
>> Immediately call an arborist for an assessment.
When to Call an Arborist
As these examples demonstrate, certain observations will require further assessment by a qualified arborist.
Tree risk assessments should be conducted by a qualified arborist and use the International Society of Arboriculture tree risk assessment qualification method, as outlined in ANSI A-300 Part 9: Tree, Shrub, and Other Woody Plant Management – Standard Practices (Tree Risk Assessment a. Tree Failure).
Additionally, call your arborist outside of your regularly scheduled assessments:
after any major weather event, like a windstorm;
if you observe a new or changing condition that could be a health problem, such as persistent wilt or changed foliage color;
if a tree experiences a large part or branch failure or a sudden structural change, such as developing a crack or a lean; or
if you are concerned about a tree’s response to a piece of hardware.
The earlier an arborist can assess a problem, the likelier it is they can make an effective tree management recommendation, reducing costs and preventing risk.
Monitoring your course trees in-house will keep you informed of any new or developing tree issues and enable you to ask for expert input and act early.
For more on tree assessments, see: “Reading the Trees,” Adventure Park Insider Summer 2021, where the Tree Solutions team discusses how to read symptoms and signs of biotic and environmental stress in trees; and “Know Your Assessments,” Adventure Park Insider Winter 2022, in which Tree Solutions explains the different levels of professional tree assessment that can be used to diagnose problems and determine forest management strategies.


